peter (admin) -

Kubernetes Resource Limits and OOMKilled
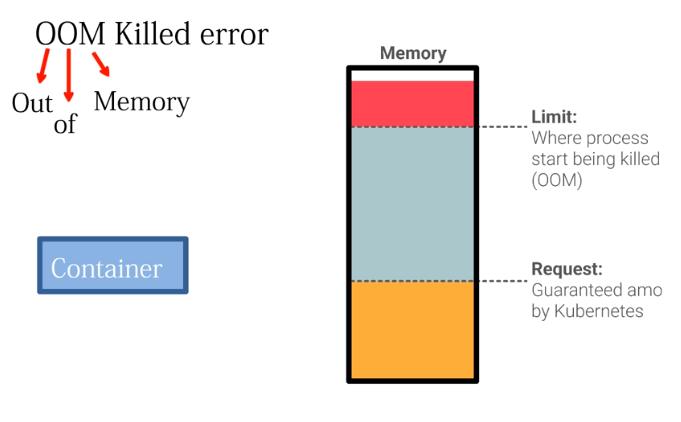 OOMKilled
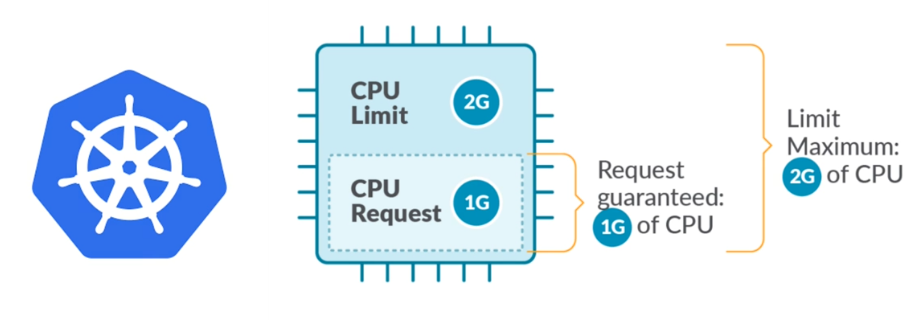
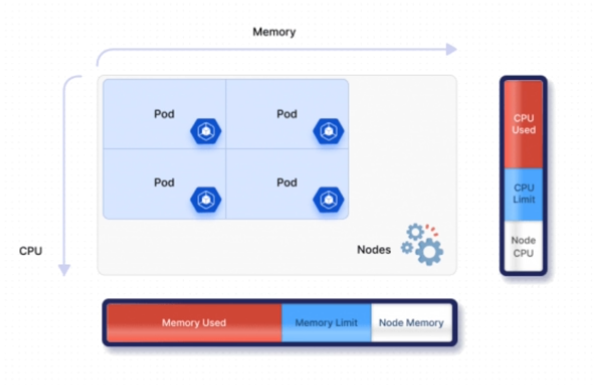
Kubernetes resource requests and limits help control CPU and memory usage so applications can run reliably without exhausting node resources.
Let's get started.
Create a Pod with Memory Limits
For this, we are already logged into both the Master node and the Worker node.
Here we create a Pod configuration using a YAML definition. YAML allows us to clearly define how a container should run and how many system resources it is allowed to consume.
The goal is to intentionally demonstrate what happens when a container tries to use more memory than the limit assigned to it. This will help us understand OOMKilled behavior in Kubernetes.
To pass the configuration directly to Kubernetes without creating a separate file, we can use a here-document:
cat <<EOF | kubectl apply -f -
apiVersion: v1
kind: Pod
metadata:
  name: oom-demo
spec:
  containers:
    - name: memhog
      image: python:3-alpine
      command:
        - python
        - -c
        - |
          x = bytearray(200 * 1024 * 1024)
          print("Memory allocated")
          import time
          time.sleep(3600)
      resources:
        requests:
          memory: "50Mi"
        limits:
          memory: "100Mi"
EOF
This allows us to type the YAML definition directly into the terminal and immediately apply it to the cluster.
Define the Pod
At the beginning of the definition, we specify:
apiVersion: v1
kind: Pod
The apiVersion specifies the API version for core Kubernetes resources.
The kind: Pod field tells Kubernetes that we want to create a Pod.
Next, we assign a name to the Pod:
metadata:
  name: oom-demo
The name oom-demo allows Kubernetes to identify and manage this Pod inside the cluster.
Configure the Container
Inside the Pod specification, we define the container:
containers:
  - name: memhog
    image: python:3-alpine
The container is named memhog because it will intentionally consume a large amount of memory.
It uses a lightweight Python container image so that we can easily execute a small Python program inside the container.
Instead of running a normal web application, the container executes a Python command that intentionally allocates a large amount of memory:
x = bytearray(200 * 1024 * 1024)
This attempts to allocate approximately 200 MiB of memory.
The program then prints a message and attempts to sleep:
print("Memory allocated")
import time
time.sleep(3600)
The purpose is to simulate a process that attempts to consume more memory than it is allowed to use.
Configure Resource Requests
Next, we configure the resource management section:
resources:
  requests:
    memory: "50Mi"
A resource request tells Kubernetes how much memory the container is expected to need.
The scheduler uses this value when deciding which node has sufficient resources to run the Pod.
In this example, the container requests:
50Mi
Kubernetes therefore considers at least 50 MiB of memory when scheduling the Pod onto a node.
Configure the Memory Limit
We also define a memory limit:
limits:
  memory: "100Mi"
A resource limit specifies the maximum amount of memory the container is allowed to use.
In this example, the limit is:
100Mi
However, our Python process attempts to allocate approximately:
200Mi
Therefore:
Memory Request:  50Mi
Memory Limit:   100Mi
Attempted Use:  200Mi
The process attempts to exceed its configured memory limit.
When this happens, the Linux kernel's memory-control mechanisms can terminate the process. Kubernetes then reports the container's terminated state as:
OOMKilled
Create the Pod
After submitting the YAML configuration, you should see:
pod/oom-demo created
Kubernetes has now accepted the configuration and will attempt to start the container.
Watch the Pod Status
We can observe what happens in real time using:
kubectl get pod oom-demo -w
The -w option enables watch mode, which continuously displays changes to the Pod's status.
Initially, you may see:
NAME       READY   STATUS              RESTARTS   AGE
oom-demo   0/1     ContainerCreating   0          1s
ContainerCreating means Kubernetes is preparing the environment for the container. This can include pulling the image, creating the Pod sandbox, configuring networking, and preparing the container runtime.
The container then starts and the Python process attempts to allocate a large amount of memory.
Because the process tries to exceed its 100Mi memory limit, it is terminated.
OOMKilled and CrashLoopBackOff
After the memory limit is exceeded, Kubernetes records the container termination reason as:
OOMKilled
Because the default restart policy for a Pod is Always, the kubelet attempts to restart the failed container.
However, every time the container starts, the Python program attempts to allocate the same excessive amount of memory.
The container therefore fails repeatedly.
Eventually, the Pod may show:
CrashLoopBackOff
CrashLoopBackOff means the container is repeatedly failing and Kubernetes is delaying subsequent restart attempts.
The cycle looks like this:
Container Starts
       ↓
Python Allocates Memory
       ↓
Memory Exceeds 100Mi Limit
       ↓
Process Terminated
       ↓
OOMKilled
       ↓
Container Restarted
       ↓
Memory Limit Exceeded Again
       ↓
OOMKilled
       ↓
CrashLoopBackOff
As this continues, the restart count increases.
Describe the Pod
Let's retrieve more detailed information about the Pod:
kubectl describe pod oom-demo
The current container state may show:
State:          Waiting
Reason:         CrashLoopBackOff
The Last State section should show information similar to:
Last State:     Terminated
Reason:         OOMKilled
Exit Code:      137
The important value is:
Reason: OOMKilled
This indicates that the previous container instance was terminated because it exceeded its memory limit.
Exit code 137 commonly indicates that the process was terminated by SIGKILL (128 + 9). Together with the OOMKilled reason reported by Kubernetes, this confirms the memory-limit failure.
Verify the Resource Limits
The kubectl describe output also displays the configured requests and limits:
Limits:
  memory:  100Mi
Requests:
  memory:  50Mi
This confirms that the container requested 50Mi of memory and was limited to 100Mi.
The Python process attempted to allocate substantially more than the 100Mi limit, causing it to be terminated.
Check the Termination Reason Directly
We can retrieve the previous container termination reason directly using JSONPath:
kubectl get pod oom-demo -o jsonpath='{.status.containerStatuses[0].lastState.terminated.reason}'
The output should be:
OOMKilled
This provides a quick way to confirm the reason for the previous container termination.
We can also retrieve the exit code:
kubectl get pod oom-demo -o jsonpath='{.status.containerStatuses[0].lastState.terminated.exitCode}'
You should see:
137
Check Memory on the Worker Node
We can also check the overall memory available on the Worker node:
free -h
The node may still have plenty of available memory.
For example, the node might have gigabytes of free memory while the container is still being terminated at 100Mi.
This is because the problem is not necessarily caused by the entire Worker node running out of memory.
Instead, the container itself has a strict memory limit:
Container Limit
     ↓
    100Mi
Even if the Worker node has additional free memory, the container cannot simply use that memory beyond its configured limit.
Check the Kubelet Logs
On the Worker node, we can inspect kubelet messages using:
sudo journalctl -u kubelet
To search for messages associated with the Pod or restart failures, we can use:
sudo journalctl -u kubelet | grep -iE 'oom|back-off|oom-demo'
You may see a message similar to:
Back-off restarting failed container
This indicates that Kubernetes has attempted to restart the failed container multiple times and is now applying a delay before trying again.
The backoff prevents Kubernetes from continuously restarting a failing container without delay.
Check the Container Runtime
We can also inspect containers directly from the Worker node using crictl.
To display running containers:
sudo crictl ps
However, because the memhog container is repeatedly terminating, it may not appear in a running-only listing.
To include stopped and exited containers, use:
sudo crictl ps -a
You should be able to find the container named:
memhog
associated with the oom-demo Pod.
Its state may show:
Exited
This confirms at the container-runtime level that the container was started and subsequently terminated.
Resource Requests vs Resource Limits
Resource requests and limits serve different purposes in Kubernetes:
| Setting | Purpose |
|---|---|
requests.memory |
Used by the scheduler when deciding where the Pod can run |
limits.memory |
Sets the maximum memory the container can use |
requests.cpu |
Used by the scheduler to account for expected CPU requirements |
limits.cpu |
Restricts the amount of CPU time the container can consume |
Memory limits are particularly important because exceeding a memory limit can result in the process being killed.
CPU limits behave differently. A container exceeding its CPU limit is generally throttled rather than terminated.
How OOMKilled Works
The complete process in this example can be summarized as:
Pod Created
     ↓
Container Requests 50Mi
     ↓
Container Memory Limit = 100Mi
     ↓
Scheduler Places Pod on Worker Node
     ↓
Container Starts
     ↓
Python Attempts to Allocate ~200Mi
     ↓
Container Exceeds Memory Limit
     ↓
Process Killed
     ↓
Kubernetes Reports OOMKilled
     ↓
Kubelet Restarts Container
     ↓
Same Failure Occurs Again
     ↓
CrashLoopBackOff
This demonstrates how Kubernetes resource requests and limits help control resource usage.
The memory request helps Kubernetes decide where a Pod can be scheduled, while the memory limit controls how much memory the container can use while running.
If a container attempts to exceed its memory limit, its process can be terminated and Kubernetes reports the termination as OOMKilled.
This protects the node and other workloads from a container consuming unrestricted amounts of memory.
Comments (0)
There are no comments yet. Be the first to comment.
Log in or register to leave a comment. all comments are subject to admin approval