peter (admin) -

Kubernetes Health Checks: Liveness and Readiness Probes
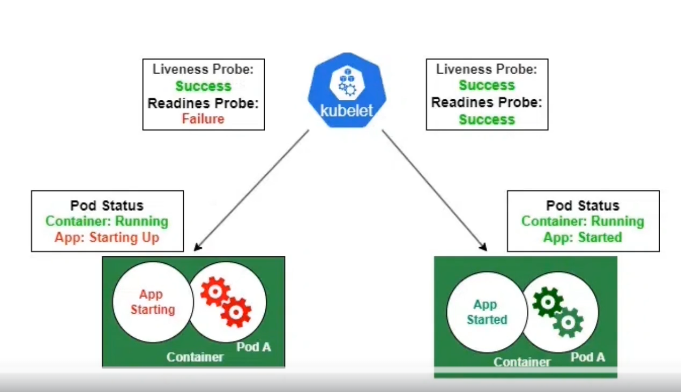
We will learn about health checks in Kubernetes, including liveness and readiness probes, which help Kubernetes automatically detect whether a container is running correctly and ready to serve application traffic.
These checks allow Kubernetes to restart unhealthy containers and ensure that only healthy and ready Pods receive user requests.
Let's get started.
Create a Deployment with Health Checks
For this, we are already logged into both the Master node and the Worker node.
Here we create a Deployment configuration using a YAML definition. YAML allows us to clearly describe the complete behavior of the application, including the number of Pods, container settings, and health-check configuration.
To send the configuration directly to Kubernetes without creating a separate file, we can use a here-document:
cat <<EOF | kubectl apply -f -
apiVersion: apps/v1
kind: Deployment
metadata:
  name: health-demo
spec:
  replicas: 2
  selector:
    matchLabels:
      app: health-demo
  template:
    metadata:
      labels:
        app: health-demo
    spec:
      containers:
        - name: web
          image: nginx
          ports:
            - containerPort: 80
          readinessProbe:
            httpGet:
              path: /
              port: 80
            initialDelaySeconds: 5
            periodSeconds: 5
          livenessProbe:
            httpGet:
              path: /
              port: 80
            initialDelaySeconds: 10
            periodSeconds: 10
EOF
This command allows us to write the YAML definition directly in the terminal and immediately pass it to Kubernetes for creation.
Define the Deployment
At the beginning of the definition, we specify:
apiVersion: apps/v1
kind: Deployment
The apiVersion specifies the Kubernetes API version used for Deployment resources.
The kind: Deployment field tells Kubernetes that we want to create a Deployment that manages multiple identical Pods.
We then provide the Deployment name:
metadata:
  name: health-demo
The name health-demo becomes the identifier Kubernetes uses to track and manage this Deployment inside the cluster.
Configure the Replicas
The spec section describes how the Deployment should behave.
Here we define:
replicas: 2
This tells Kubernetes that the Deployment should maintain two Pod replicas.
Kubernetes will attempt to keep two Pods running to provide application availability.
Configure the Label Selector
To allow the Deployment to identify the Pods it manages, we define a label selector:
selector:
  matchLabels:
    app: health-demo
The Deployment will manage Pods containing the following label:
app=health-demo
Inside the Pod template, we assign the same label:
template:
  metadata:
    labels:
      app: health-demo
The Deployment selector and Pod template labels must match.
This ensures that the Deployment correctly identifies and manages the Pods belonging to this application.
Configure the NGINX Container
Within the Pod specification, we define a container named web:
containers:
  - name: web
    image: nginx
The container uses the NGINX image, which provides a simple web server for this demonstration.
We also specify that the container uses port 80:
ports:
  - containerPort: 80
NGINX listens for HTTP requests on port 80.
Configure the Readiness Probe
The first health check is the readiness probe.
readinessProbe:
  httpGet:
    path: /
    port: 80
  initialDelaySeconds: 5
  periodSeconds: 5
A readiness probe determines whether the application inside a container is ready to serve traffic.
In this example, Kubernetes sends an HTTP request to:
/
on port:
80
The setting:
initialDelaySeconds: 5
tells Kubernetes to wait five seconds after the container starts before performing the first readiness check.
This gives the application some time to initialize before Kubernetes begins testing it.
The setting:
periodSeconds: 5
tells Kubernetes to perform the readiness check every five seconds.
If the readiness probe fails, Kubernetes marks the Pod as not ready.
A Service will then stop sending normal traffic to that Pod until the readiness probe succeeds again.
Importantly, a failed readiness probe does not cause Kubernetes to restart the container.
Configure the Liveness Probe
Next, we configure the liveness probe:
livenessProbe:
  httpGet:
    path: /
    port: 80
  initialDelaySeconds: 10
  periodSeconds: 10
The liveness probe determines whether the application inside the container is still functioning.
Like the readiness probe, it sends an HTTP request to:
/
on port 80.
However, the purpose of a liveness probe is different.
If the liveness probe repeatedly fails and reaches its configured failure threshold, Kubernetes considers the container unhealthy.
The kubelet then restarts the container according to the Pod's restart policy.
This is useful when an application is still running as a process but has become stuck or is no longer responding correctly.
Readiness vs Liveness Probes
The two probes perform different roles:
| Probe | Purpose | What Happens When It Fails |
|---|---|---|
| Readiness | Determines whether the application can receive traffic | Pod becomes NotReady and is removed from matching Service endpoints |
| Liveness | Determines whether the container is still healthy | Container is restarted after the configured failure threshold is reached |
By combining these probes, Kubernetes can continuously monitor the application.
The readiness probe helps ensure that traffic is sent only to Pods that are ready to handle requests.
The liveness probe allows Kubernetes to recover containers that have become unhealthy or unresponsive.
Create the Deployment
After submitting the YAML definition, Kubernetes should display:
deployment.apps/health-demo created
This means Kubernetes has accepted the configuration and started creating the Pods defined by the Deployment.
Verify the Pods
To verify that everything is working correctly, retrieve the Pods belonging to the health-demo application:
kubectl get pods -l app=health-demo
You should see two Pods:
NAME                           READY   STATUS    RESTARTS   AGE
health-demo-xxxxxxxxxx-xxxxx   1/1     Running   0          30s
health-demo-xxxxxxxxxx-xxxxx   1/1     Running   0          30s
Both Pods should show:
READY   STATUS
1/1     Running
The Running status means that the Pod is running, while 1/1 indicates that its container is ready.
This confirms that the Deployment started successfully and that the readiness checks are succeeding.
Examine the Health Checks
To retrieve more detailed information about the Pods, use:
kubectl describe pods -l app=health-demo
If you want to display only the first portion of the output, you can combine the command with sed:
kubectl describe pods -l app=health-demo | sed -n '1,120p'
The output displays information about the Pod and container, including:
-
Container image
-
Container port
-
Container state
-
Readiness status
-
Liveness probe
-
Readiness probe
-
Restart count
-
Events
You should see the liveness and readiness probe configurations showing that Kubernetes is performing HTTP checks against / on port 80.
For example:
Liveness:   http-get http://:80/ delay=10s timeout=1s period=10s
Readiness:  http-get http://:80/ delay=5s timeout=1s period=5s
The readiness probe checks whether the application is ready to receive traffic.
The liveness probe monitors whether the application continues to respond correctly and can cause the container to be restarted if repeated checks fail.
Verify the Containers from the Worker Node
Let's verify the containers directly from the Worker node.
This helps confirm that the containers are running at the container-runtime level and are not simply being reported through the Kubernetes control plane.
Run:
sudo crictl ps
The crictl ps command communicates with the container runtime through the Container Runtime Interface (CRI) and lists running containers.
You should see containers associated with the health-demo Pods.
The container name should be:
web
and its state should show:
Running
This confirms that the containers created by the Deployment are running successfully on the Worker node.
How Kubernetes Health Checks Work
The health-check process can be summarized as:
Container Starts
↓
Initial Delay
↓
Health Probes Begin
↓
┌───────────────┬───────────────â”Â
│ │ │
Readiness Liveness
Probe Probe
│ │
↓ ↓
Ready? Alive?
│ │
├─ Yes ├─ Yes
│ Receive │ Continue
│ Traffic │ Running
│ │
└─ No └─ No
Remove Restart
from Service Container
traffic
Readiness and liveness probes provide Kubernetes with two different views of application health.
The readiness probe answers:
Is this application ready to receive traffic?
The liveness probe answers:
Is this application still functioning, or should its container be restarted?
Together, these mechanisms help Kubernetes maintain application availability, prevent traffic from reaching unready Pods, and automatically recover containers that become unhealthy.
Comments (0)
There are no comments yet. Be the first to comment.
Log in or register to leave a comment. all comments are subject to admin approval