peter (admin) -

Scaling Applications in Kubernetes
Introduction
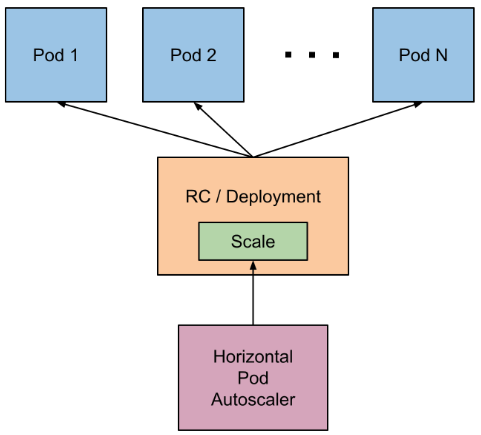 We will learn how to scale applications in Kubernetes by increasing or decreasing the number of Pod replicas, which is commonly known as scale out and scale in.
This allows applications to handle more or fewer user requests by dynamically adjusting the number of running Pods.
Let's get started.
Scaling the Deployment Up
For this, we are already logged into both the master node and the worker node.
Let's move on and first scale the web-app Deployment by increasing the number of replicas to five.
This means Kubernetes will automatically create additional Pods so that a total of five identical copies of the application are running in the cluster.
kubectl scale deployment web-app --replicas=5After pressing Enter, you can see the message confirming that theweb-appDeployment has been successfully scaled.
Now Kubernetes starts creating the additional Pods to match the new desired state.
To verify the scaling operation, we run:
kubectl get pods -l app=web-app -o wide
After pressing Enter, you can see that five Pods are now running.
Each Pod has a unique name and IP address, which confirms that Kubernetes successfully created additional replicas to match the desired state of the Deployment.
Furthermore, we can check the ReplicaSet by running:
kubectl get rs -o wide
After pressing Enter, you can see that the ReplicaSet shows five desired, five current, and five ready replicas.
This confirms that it is successfully maintaining the required number of Pods defined by the Deployment.
Scaling the Deployment Down
Let's move on, and this time we scale the web-app Deployment down to two replicas.
We do this to learn how Kubernetes can reduce running Pods when the application does not need many resources.
This helps save system capacity and maintain efficient resource usage.
kubectl scale deployment web-app --replicas=2
This means Kubernetes will remove the extra Pods and keep only two running copies of the application.
After pressing Enter, you can see the message confirming that the Deployment has been successfully scaled to match the new desired state.
Testing the Service After Scaling
Now, to verify that the service is still responding correctly after scaling, we move to the worker node.
Here we use a for loop, which repeats the same request many times so we can test the application again and again instead of typing the command manually each time.
Inside this loop, we use the curl command to send an HTTP request to the worker node IP address and NodePort 31503, which is the external port opened by the Kubernetes service.
We use /dev/null so the actual web page content is discarded.
This is because we are not interested in the HTML page content itself. We only want to check whether the request succeeds or fails.
Then we use the --write-out option with http_code so curl prints only the response status code for each request.
The word done at the end simply closes the loop and tells the shell that the repeated task is complete.
After pressing Enter, you can see multiple 200 values.
The value 200 means HTTP OK, which confirms that every request successfully reached the application.
This helps us learn that even after scaling, Kubernetes continues routing traffic correctly and the service remains stable and reachable.
Summary
So, this is a simple explanation of how scaling applications works in Kubernetes.
We can increase the number of Pods to handle more traffic, which is called scale out, or we can reduce the number of Pods to save resources when demand is low, which is called scale in.
Meanwhile, Kubernetes automatically maintains the desired state of the system.
Comments (0)
There are no comments yet. Be the first to comment.
Log in or register to leave a comment. all comments are subject to admin approval