peter (admin) -

Preparing the Master and Worker Nodes for Kubernetes
VM Setup
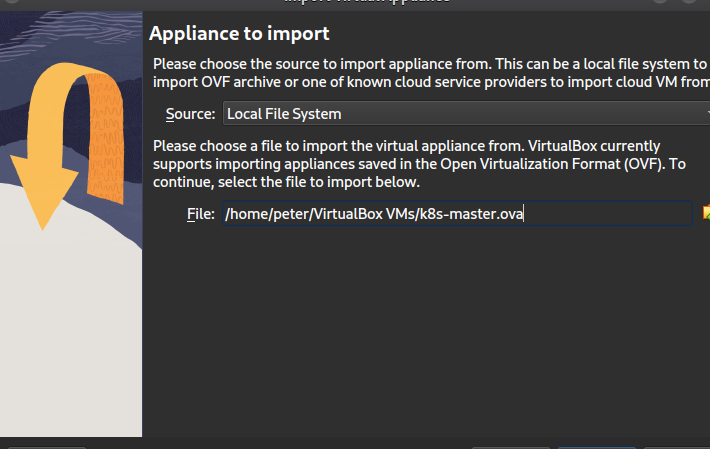
Before we start we need to use the ova file you previously exported to import our 2 VMs. So open the VirtualBox main window and click on File->Import appliance, keep the default settings on this page and browse to your .ova file
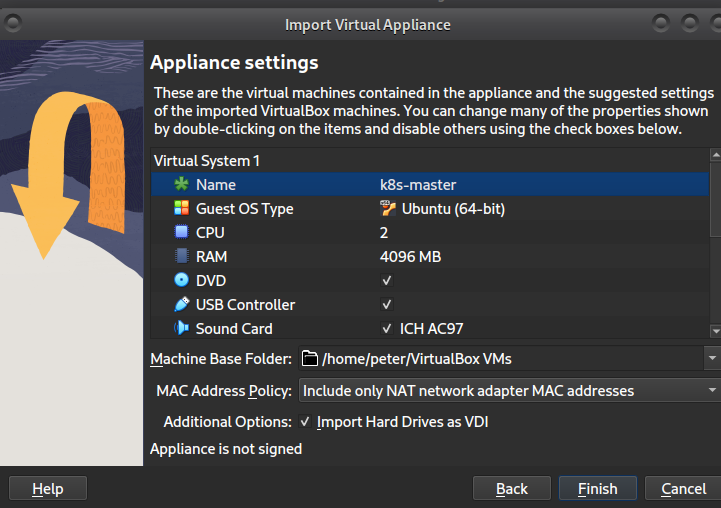
Now Change the name to what you want it to be, this is only the name that will appear in VirtualBox
Now start each machine and and log in on the VirtualBox cosole and run the following command
ip -4 addr
Now note the ip address for later
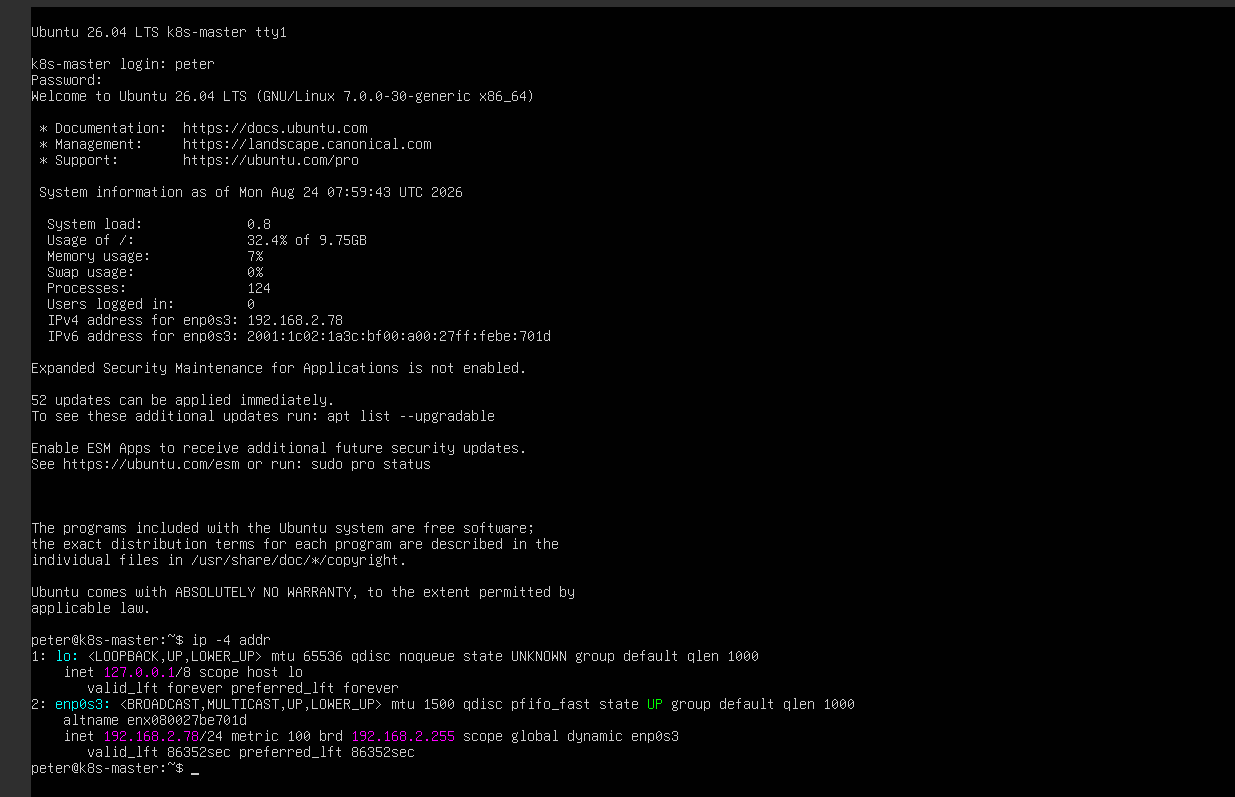
From this you can see my ip address is 192.168.2.78
Do this for both machines
Set up auto login
Now we can set up our user to login without being prompted for a password each time. This should work If you use Linux, Mac or Windows with the Windows Sybsystem for Linux (WSL) enabled or the openssh command installed on powershell. If you use Putty it is possible to do it inside the UI.
First generate a key whthout a passphrase (when prompted for a pasphrase hit enter), then run ssh-copy-id to copy your credentials then test the connection. Do this on both machines as seen below.
Note: if you get a connection refused error it is likely an issue with key generation on the server side and you need to log in to the server on the VirtualBox console and run the following
sudo ssh-keygen -A
sudo systemctl restart ssh
Now generate your local key and run the following against each machine
ssh-keygen #hit enter for empty password
ssh-copy-id [IP of VM] # enter your password once
# Now test you can log in without a password
ssh [IP of VM]
Next we need to change the hostname of each server because it will be set to the same value for the server you imported from each time. The commands below will set your hostname and reboot the server
peter@peter-DevLab1:~$ ssh 192.168.2.78

Welcome to Ubuntu 26.04 LTS (GNU/Linux 7.0.0-30-generic x86_64)
peter@k8s-master:~$ sudo bash

[sudo: authenticate] Password:

root@k8s-master:/home/peter# echo "k8s-master" > /etc/hostname

root@k8s-master:/home/peter# cat /etc/hostname

k8s-master

root@k8s-master:/home/peter#  sudo reboot
peter@peter-DevLab1:~$ ssh 192.168.2.98

Welcome to Ubuntu 26.04 LTS (GNU/Linux 7.0.0-30-generic x86_64)

peter@k8s-master:~$ sudo bash

[sudo: authenticate] Password:

root@k8s-master:/home/peter# echo "k8s-worker1" > /etc/hostname

root@k8s-master:/home/peter# cat /etc/hostname

k8s-worker1

root@k8s-master:/home/peter#  sudo reboot
Disabling Swap
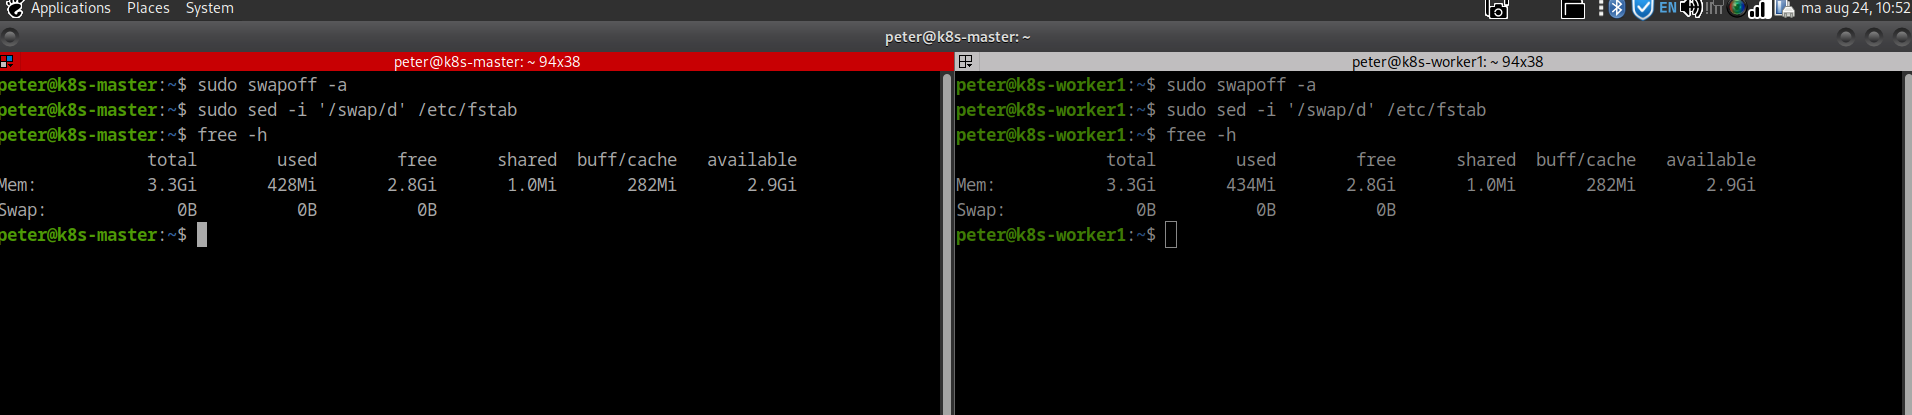
The first step is to disable swap on the master node.
Kubernetes requires swap to be turned off because the Kubernetes scheduler and kubelet need full control over system memory. If swap is enabled, Kubernetes may not schedule Pods correctly, or the cluster setup may fail during initialization.
First, we disable swap temporarily so that it stops working immediately. Then we disable swap permanently by removing or commenting out the swap entry in the system configuration file.
This ensures that swap does not become enabled again after a system reboot.
After making these changes, we verify the configuration using a memory check command. The swap value should now show zero, confirming that swap has been successfully disabled.
As you can see below swap is now disabled on both machines
Loading the Required Kernel Modules
Next, we load the kernel modules required by Kubernetes.
The overlay module helps containers manage their filesystems. Containers use multiple filesystem layers, where some files can be shared and others are unique to individual containers.
The overlay module combines these layers and presents them as a single filesystem to the container.
The br_netfilter module is related to networking. It allows network traffic passing through Linux bridges to be processed by the appropriate Linux networking and firewall mechanisms.
Kubernetes networking can depend on this functionality for communication between Pods and nodes.
We activate these modules with the commands below on each machine
$ sudo modprobe overlay$ sudo modprobe br_netfilterMaking the Kernel Modules Persistent
Loading these modules manually only affects the current running system. After a reboot, they may not automatically be loaded.
To make them persistent, we create a configuration file under the modules-load directory containing:
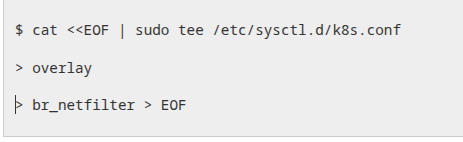
This tells Linux to load both modules automatically during system startup.
The system is now permanently prepared with the kernel functionality required for container filesystems and Kubernetes networking.
Configuring Kubernetes Networking
Next, we configure the Linux networking settings required by Kubernetes.
We create a sysctl configuration containing settings such as:
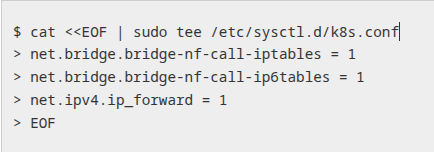
A value of 1 means that the feature is enabled.
The bridge settings allow bridged network traffic to be handled by the relevant firewall mechanisms.
IP forwarding allows Linux to forward packets between network interfaces. This is particularly important for communication between Pods, nodes, and other networks.
After creating the configuration, we apply the settings immediately using:
sudo sysctl --system
This causes Linux to read its sysctl configuration files and apply the values without requiring a reboot.
When the relevant values show = 1, the required networking functionality has been enabled.
Configuring the Master Node Firewall
Next, we configure the firewall on the control-plane node.
In a Kubernetes cluster, different components communicate over specific network ports. If the firewall blocks the required traffic, parts of the cluster will not function correctly.
One of the most important ports is: 6443/TCP
Port 6443 is used by the Kubernetes API server. Worker nodes, administrative tools such as kubectl, and other Kubernetes components communicate with the API server through this port.
The etcd server commonly uses: 2379-2380/TCP
etcd is the key-value database used to store Kubernetes cluster state.
Another important port is: 10250/TCP
Port 10250 is used by the kubelet API on nodes.
So first we intstall ufw it it is not already installed, it is pretty much just an interface to iptables.
"UFW (Uncomplicated Firewall) is a higher-level interface for managing Linux firewall rules, but on modern Linux the underlying implementation may be iptables or nftables," depending on the system.
Rules updated
Rules updated (v6)
peter@k8s-master:~$ sudo ufw allow 2379:2380/tcp
Rules updated
Rules updated (v6)
peter@k8s-master:~$ sudo ufw allow 10250/tcp
Rules updated
Rules updated (v6)
Status: inactive
Rules updated
Rules updated (v6)
Command may disrupt existing ssh connections. Proceed with operation (y|n)? y
Firewall is active and enabled on system startup
Adding the Docker Repository and installing containerd
Next, we add the official Docker software repository.
We are using this repository to obtain the container runtime packages needed for our Kubernetes environment.
Although we add the Docker repository, we do not need to install the Docker Engine itself. Modern Kubernetes communicates with container runtimes through the Container Runtime Interface (CRI).
For this setup, we use containerd.
We now install containerd, which provides the container runtime Kubernetes will use to create and run containers.
Once the package installation completes, Kubernetes has the basic runtime required to run its workloads.
The relationship can be thought of as:
Kubernetes->kubelet->CRI->containerd->Containers
Similar to what we did in the Minikube section, we run the following bash script to set up the repositoty and install containerd
set -e
echo " Starting Docker Installation on Ubuntu Server "
echo "================================================="
echo "-> Cleaning up older Docker installations..."
for pkg in docker.io docker-doc docker-compose docker-compose-v2 podman-docker containerd runc; do
sudo apt-get remove -y $pkg || true
done
echo "-> Updating apt package index and installing prerequisites..."
sudo apt-get update
sudo apt-get install -y ca-certificates curl
sudo install -m 0755 -d /etc/apt/keyrings
sudo curl -fsSL https://download.docker.com/linux/ubuntu/gpg -o /etc/apt/keyrings/docker.asc
sudo chmod a+r /etc/apt/keyrings/docker.asc
echo "deb [arch=$(dpkg --print-architecture) signed-by=/etc/apt/keyrings/docker.asc] https://download.docker.com/linux/ubuntu $(. /etc/os-release && echo "$VERSION_CODENAME") stable" | sudo tee /etc/apt/sources.list.d/docker.list > /dev/null
echo "-> Updating apt index with new repository..."
sudo apt-get update
sudo apt-get install -y containerd.io
sudo systemctl enable containerd.service
echo " Setup complete! "
echo "================================================="
Configuring containerd
Next, we configure containerd so that it works correctly with Kubernetes.
First, we create the containerd configuration directory:
/etc/containerd/
We then generate its default configuration and save it as:
/etc/containerd/config.toml
This file contains the runtime settings controlling how containerd handles containers, images, plugins, and system resources.
We make sure that the CRI plugin is enabled because kubelet uses CRI to communicate with containerd.
If CRI is disabled, kubelet cannot communicate correctly with the runtime and Kubernetes initialization can fail.
We also configure containerd to use the systemd cgroup driver:
SystemdCgroup = true
Using compatible cgroup configuration between kubelet and containerd helps prevent resource-management problems involving CPU and memory.
After changing the configuration, we save the file and restart containerd.
We enable containerd so that it automatically starts whenever the machine boots.
We then restart the service so that our configuration changes take effect immediately.
At this point, containerd is running with the settings required for our Kubernetes environment.
Configuring crictl
Next, we configure crictl.
crictl is a command-line utility for communicating with CRI-compatible container runtimes such as containerd.
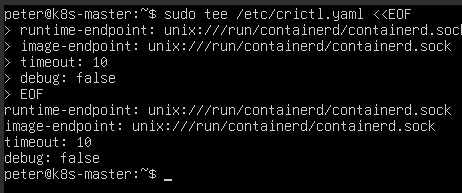
We configure its runtime and image endpoints to use the containerd socket, typically:
unix:///run/containerd/containerd.sock
This ensures that when we use crictl to inspect containers, Pods, images, or runtime information, it communicates with the correct container runtime.
The configuration also specifies a timeout and can disable debug output to keep normal command output clean.
In simple terms, this configuration prevents runtime connection confusion and ensures crictl communicates directly with containerd.
So run the commands below
Now install it
#!/bin/bash
VERSION="v1.35.0"
wget https://github.com/kubernetes-sigs/cri-tools/releases/download/$VERSION/crictl-$VERSION-linux-amd64.tar.gz
sudo tar -xzf crictl-$VERSION-linux-amd64.tar.gz -C /usr/local/bin
rm crictl-$VERSION-linux-amd64.tar.gz
Master Node Preparation Complete
At this stage, preparation of the control-plane node for the kubeadm cluster is complete.
We have configured:
- Swap
- Kernel modules
- Kernel networking parameters
- Firewall rules
- containerd
- CRI support
- systemd cgroups
- crictl
The machine is now ready for the next stage of the kubeadm cluster installation.
Preparing the Worker Node
We now perform similar preparation on the worker node.
The worker node requires the same fundamental system configuration as the control-plane node, including swap configuration, kernel modules, networking settings, and containerd.
One important difference is the firewall configuration.
The worker node needs port: 10250/TCP
for kubelet communication.
If applications will be exposed using Kubernetes NodePort Services, the standard NodePort range is: 30000-32767/TCP
The exact ports that need to be opened depend on the cluster networking and services being used.
So now log in to the worker VM and repeat all the configuration we just did on the master but in the firewall section only open ports 22/tcp, 10250/tcp and 3000:3276/tcp
Once these settings have been applied, the worker node has the same fundamental container runtime and operating-system preparation as the control-plane node.
Both machines are now prepared for the kubeadm cluster setup, including the required system configuration, networking support, and container runtime.
Comments (0)
There are no comments yet. Be the first to comment.
Log in or register to leave a comment. all comments are subject to admin approval